Earlier I Posted that How to Enable your Facebook Timeline and Now Facebook Timeline is coming whether you like or not. In the next few weeks, your Facebook profile will be assimilated, giving you seven days to get your house in order before everyone can browse through your virtual history.
So before Activating Your Facebook Timeline, You must Know these 5 things that will helps you to understand Timeline more effective.
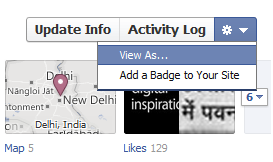
 On your Facebook Timeline, you should see a little gears icon on the far right. Click on it, and then select the “View As” option. This will let you view your profile as if you were a stranger or let you pick a specific person to see how he or she sees your profile. It’s a handy tool to use when trying to evaluate how well you’ve cleaned up your profile.
So before Activating Your Facebook Timeline, You must Know these 5 things that will helps you to understand Timeline more effective.
" SEE ALSO : 10 most interesting Facebook Timeline Profile "
1. ‘Hide from Timeline’ Is Your Friend
Get ready to click “Hide from Timeline” a lot. You can find it under the “Edit or Remove” pencil icon that comes up when you hover your mouse over the top right corner of every Timeline post. Remember, it’s not just embarrassing photos that Timeline unearths — it’s every inappropriate status update you’ve ever posted and every asinine message your old college buddies have ever written on your wall at 3 a.m.
If you’ve had Facebook for a long time, you’re going to want to spend at least an hour combing through everything in your virtual past and hiding what you don’t want seen. You can also remove or hide posts through your “Activity Log,” which presents everything posted on your profile in a more compact, easy-to-digest form.
2. Smile! Your Album Covers Are Now Huge
Before, old photo albums hid in an archive — a collection of small thumbnails that only the most committed Facebook stalker would search through. Now it’s all front and center on your Timeline. That means that the photo of you drinking a giant novelty margarita in Las Vegas could now be displayed in unsettling clarity in one of Timeline’s two giant columns. If you want to keep your photo albums visible, but just want to switch the cover to something a little less embarrassing, click “Change Primary Photo” in the “Edit or Remove” menu.
3. The Internet Knows Where You Are
Photos and photo albums can now be tagged with locations, which are then displayed neatly on a map. That means if your friend geotags your album “Vacation Time,” all of a sudden instead of just photos from a cabin in the woods, everyone can tell that your August vacation took place near Lake Tahoe. Now you have to either untag yourself from every geotagged photo or have your friend manually remove the geotag from every photo you’re in. It’s a total pain. Welcome to Timeline.
4. Violation of Privacy? There’s an App for That
A lot of the apps out there for Timeline are pretty cool, but a few venture into TMI territory or, at the very least, turn your profile into a kind of corporate billboard. Think carefully before you let a third-party app have permission to automatically add activity to your Timeline. Do you really want everyone to know where and what you’re eating at all times or what products you’re buying online?
You can always manage your apps by clicking on “Account Settings” in the very top right pull-down menu on your profile. Then click “Apps,” and you’ll be presented with a list of all the apps that have access to your Timeline. Remove the ones you don’t like or, under “App activity privacy,” change who can and can’t see the content posted by that app.
Remember, you can always remove any individual embarrassing app revelations on your Timeline by clicking “Hide from Timeline.”
5. When in Doubt, ‘View As …’
 On your Facebook Timeline, you should see a little gears icon on the far right. Click on it, and then select the “View As” option. This will let you view your profile as if you were a stranger or let you pick a specific person to see how he or she sees your profile. It’s a handy tool to use when trying to evaluate how well you’ve cleaned up your profile.


Comments
Post a Comment